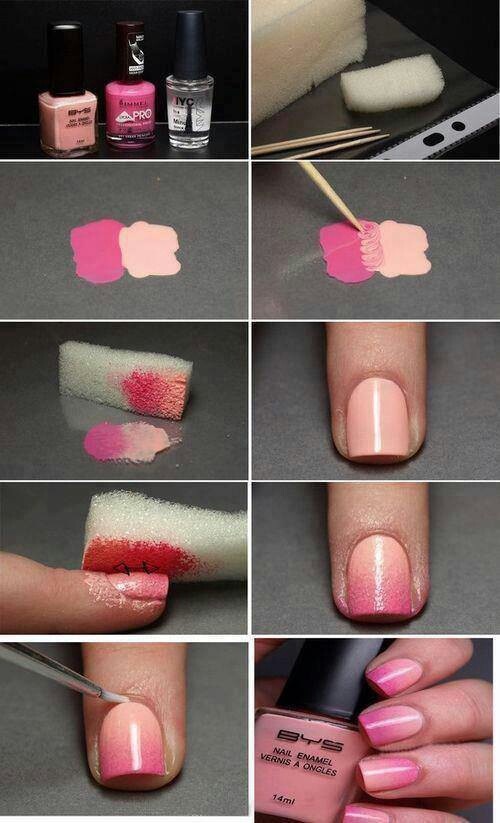
Do you know the ideal nail shape for your manicure? Discover five different nail shapes and how to file them.

Oval
The tapered side walls of the oval create an elegant shape for women. Oval shapes flatter both wide and narrow nail beds, and add length with a graceful tip. To achieve the perfect oval shape, file side walls straight to make sure they’re even. Then, shape the side walls into a rounded oval, making sure the angles are even on each side.
Square
With strong side walls and sharp or rounded tips, this shape is classic French. The square is ideal for a bigger nail bed (it tends to make smaller nail beds look shorter and wider). To create this timeless shape, file the side walls straight and make sure they’re perpendicular to the free edge of the nail. Once you’ve got the perfect square, angle your emery board and bevel the nail.
Square Oval (Squoval)
Combining the elegance of the oval with the strength of the square, the squoval is a popular nail shape for most fingers. First begin with a square with straight and even side walls. File the corners until your free edge is rounded and beveled. Remember, you still want strong side supports—don’t go too file-happy.
Round
As one of the most conservative shapes of the bunch, the round shape is ideal for men and those who like to maintain short nails. This shape is flattering for wide nails, and gives the illusion of a thinner nail bed. File the side walls straight like a square, then round the free edge into that perfect swooping circle.
Almond/Point
The pointed nail is a popular style for acrylic and nail art designs, especially in Eastern Europe and Asia. This avant-garde shape is popular among celebrities—Fergie and Lady Gaga are always rocking it! And while it’s not favored for the everyday look, this extreme shape can actually slenderize and lengthen the fingers. File the side walls evenly and taper until you’ve reached the desired tip.
Deciding Your Shape
How do you decide which nail shape is right for you? If your nail beds are wide, try a squoval shape. If they’re narrow, try a sharp square shape to widen and strengthen. If you keep short nails, a rounded shape is your best bet for low-maintenance style. You can also look at the lunula (the half-moon shape on your nail bed) for nail-shaping guidance. If it’s more curved, try oval or rounded shapes. If it’s flat, you’re better off shaping your nails square or squoval.